Thursday, 18 May 2017

Fascia and Gutters

     Today we finished the fascia board, by drilling holes and riveting the piece that attaches the two sides.

     Here is a picture of the whole house with the fascia board on.

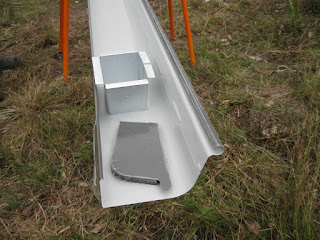
     Then we started playing with gutters. We had to cut the holes for the gutter outlets to sit into. For this Josh marked the rectangles, drilled holes at the corners, put the nibbler attachment into one of the holes and cut out the rectangle. Of course there was lots of swearing and finicky readjusting before it was the right size.

     We have now done the outlets for the gutter on each side of the house. Next the gutter stops for the ends need to be attached with silicone, holes drilled and rivets put through. Also we need to cut the other ends of the gutters to length, we were given 4 pieces each 5.6 metres long which is ridiculously long. I think we have figured out that after taking into consideration the barge boards, the colourbond cladding and the sarking how much we need to cut the other pieces to. We want the downpipes to be as close to the house as possible in order to be able to attach it to the house for support. This measurement may change when we realise other factors which need considering. Anyway we can't start to silicone until we know that it will stay dry for 24 hours, and we have lots of rain forecast!


Tuesday, 16 May 2017

Fascia Boards

     Today the fascia boards were put up on their brackets. Here is the first one up. The installation instructions were 'Just clip them on' but in real life it was much more difficult. It ended up being easier to slide them in from the end.

     And then the second fascia board had to be cut to size, as for some reason they have given the pieces to us at 5.4m long each, even though the house is only 10m long - not 10.8m. We used our wonderful new cordless drill with our new nibbler attachment. It was a bit fiddley to get around the multiple bent corners on each side, requiring some fiddling with tin snips, a hack saw and some vice grips, but got there in the end. Those nibblers are fantastic! - easy to cut through the metal and giving quite a clean edge. Just required a little clean-up with a file.


     Then the two pieces needed to be joined with a special joining piece, with some holes screwed through and then the pieces riveted together. Today it was almost finished, hopefully it will be fully finished tomorrow.

     Then the next step will be the gutters, which need to be pre-assembled and then clipped onto the fascia board. And this is only one side of the house - all of this will need to be repeated on the other side.

Thursday, 11 May 2017

Fascia Board Brackets

          Today Josh screwed on all the fascia board brackets for one side of the house.

          We bought a new cordless drill since the battery had died on the old one, and so we didn't need to have the generator running to do some screwing, which was nice. The other side of the house is on the downhill, so not sure how the ladder is going to reach in order to screw those ones on!

          Meanwhile I was doing some gardening and planting tomatoes, and also collecting clay to use to build my rocket oven. Always something to do!