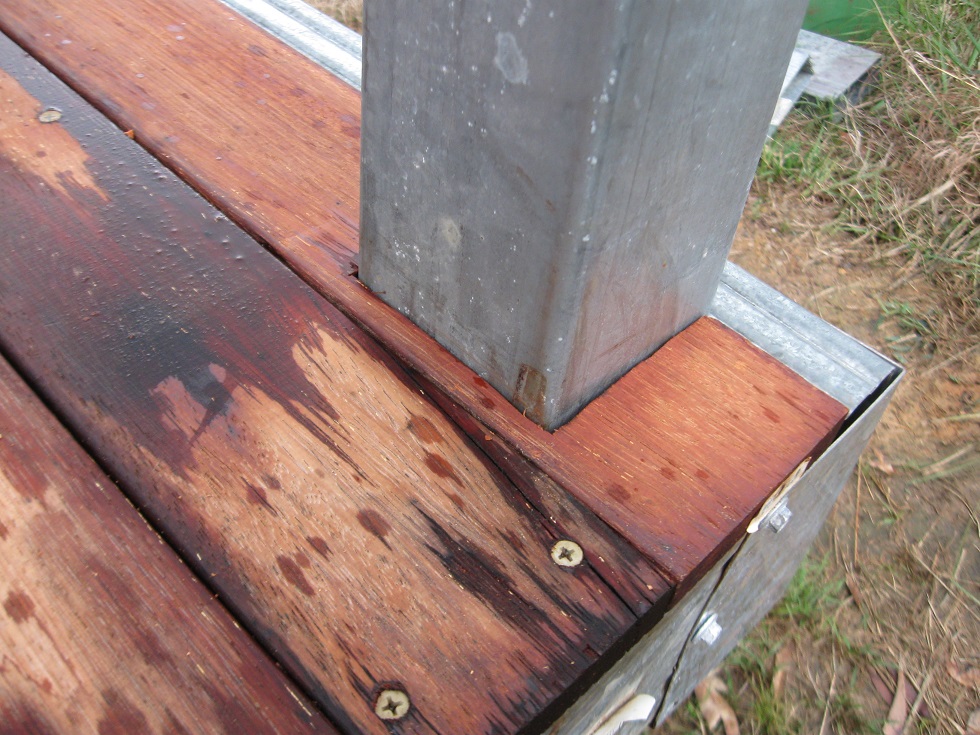
I snuck back down after the sudden downpour of rain and managed to finish cutting all the notches for the verandah boards.
I also cut a couple more boards for the short end of the verandah, now it is also finished except for a couple of boards which need shortening a centimetre or two. They will be easy to do now I have the new blade on the hacksaw! Although cutting wood when it is wet is no fun, as the sawdust sticks to the plank and you can't blow it away, and then when you rub it off it disappears the cut mark.
I have found a place which sells the screws I need - SDCWC31040 - and it's 'only' a 90 minute drive away. I have the day off work because of the rain, so may as well take this opportunity. What I have to do now is count how many I need...
Monday, 16 October 2017
Saturday, 14 October 2017
Another notch
I had 10 minutes between rain showers to cut another notch for the verandah.
The next notch is only slightly indented into the plank. I cut into each side with the hacksaw, then used the cordless drill to drill holes along the notch, and then hammered the wood chisel along the bottom edge to remove the unwanted wood. It all comes out surprisingly easily.
I am very happy with my new blade for the hacksaw, it is 24 teeth per inch so perhaps not the best for cutting wood, the internet says 14 teeth per inch is ideal for timber, but worked great for this small cut.
The next notch is only slightly indented into the plank. I cut into each side with the hacksaw, then used the cordless drill to drill holes along the notch, and then hammered the wood chisel along the bottom edge to remove the unwanted wood. It all comes out surprisingly easily.
I am very happy with my new blade for the hacksaw, it is 24 teeth per inch so perhaps not the best for cutting wood, the internet says 14 teeth per inch is ideal for timber, but worked great for this small cut.
Walking the Plank
I have put in a few more half days work on the verandah and it is
slowly coming to completion. Instead of driving the work 4WD down to
the house site, as it currently functions as a very large and easily
transportable tool box, I just loaded a few tools into the
wheelbarrow and trundled it down. Of course Murphy's Law says you
always forget ONE thing every time, and have to walk up the hill
again, but that's just extra exercise, and exercise is good for you!
I got myself organised for some early morning screwing only to
discover that we have no more screws. I looked EVERYWHERE - the 4WD,
the shed, the annex, the caravan - and then looked EVERYWHERE again,
but no luck. It turns out that yet again the kit home company has not
supplied us with sufficient components. We have some left-over screws
from the yellow-tongue flooring which are quite similar but just a
little bit different. Unfortunately we can't just 'pop out' to the
hardware store to buy more as it is long drive. It is great that we
have the option to buy these things over the internet (and often
cheaper than a real shop) but we have to know a) exactly what type of
screw it is and b) have to wait for delivery. The kit-home company have 'helpfully' told me that I have to go and buy myself some more screws, but have not actually told me the specifications of what I need to buy.
In the meantime I have been cutting planks to length, and cutting
out notches to fit around the verandah posts. It is quite the jigsaw
puzzle as the last few planks of merbau all have something wrong with
them - bent one way, bent the other way, have splits or notches or
are too short. I have done my best to figure it out, and then had to
figure out the best way to cut out the notches. There has to be one plank with a notch for the inside of the post, and another plank with a notch for the outside of the post.
Also most of the planks for the end of the verandah have been cut now, just a few more to go. I popped out to the local hardware store and bought some new blades for the hacksaw, since the ones we had were so horribly blunt they were very painful to use. I am very much looking forward to trying the new blades, which only cost $2.50 each, but it is currently bucketing down with rain so I might not get a chance for a while!
Saturday, 12 August 2017
Another day of screwing the deck
A beautiful day of winter sunshine and some more decking drilled.
The moment the smoke came out of the hole was captured, it looks like a smoking gun!
I figured out that if I give the screw a 'bang' into the wood before I start screwing, it stops the screw dancing around and makes it easier to put the screw exactly where I want it. Two more lines of screws finished, each one neater than the last.
I also measured and sawed a plank of merbau to length to help finish off the end of the deck. I had to go through about 7 planks before I found one which was not bent out of shape. The planks are all a bit out of whack so getting them to line up against each other without big gaps will be a bit of jigsaw puzzle!
I put the measurement line underneath the plank, and so turned it over to cut it. This unfortunately meant that the messy side of the cut was uppermost at the end.
Next time I suppose I should turn the plank over and then draw the line, so that I can saw from the top. I will just have to make sure that none of the line is left showing at the end as it would be a bit unsightly.
The moment the smoke came out of the hole was captured, it looks like a smoking gun!
I figured out that if I give the screw a 'bang' into the wood before I start screwing, it stops the screw dancing around and makes it easier to put the screw exactly where I want it. Two more lines of screws finished, each one neater than the last.
I also measured and sawed a plank of merbau to length to help finish off the end of the deck. I had to go through about 7 planks before I found one which was not bent out of shape. The planks are all a bit out of whack so getting them to line up against each other without big gaps will be a bit of jigsaw puzzle!
I put the measurement line underneath the plank, and so turned it over to cut it. This unfortunately meant that the messy side of the cut was uppermost at the end.
Next time I suppose I should turn the plank over and then draw the line, so that I can saw from the top. I will just have to make sure that none of the line is left showing at the end as it would be a bit unsightly.
Sunday, 6 August 2017
Screwing the Decking
The decking has been nearly half screwed in now, looking good...
It is so lovely to finally have somewhere on this 17 acres that I can comfortably walk barefoot - pure bliss!
I was given a demo on how to screw in the screws, a bit more tricky than it may seem at first. The screw has to screw through the wood first, and then through the metal underneath.
The hole in the wood is a little oversized due to the wings on the bottom part of the screw, so it is a little difficult to stop it from wiggling around sideways. And as the screws are heavily galvanised to protect from rust, they are not very sharp for cutting through wood. This means that it generates a lot of heat as it spins around quickly while very slowly moving downward, so some lovely wood smoke comes out of the hole and the sawdust comes out looking a bit black and singed. (Don't worry, it is not a bushfire hazard.)
When the screw finally hits the metal it suddenly screws downwards very quickly. The wrists get a bit sore as it requires a fair bit of downward pressure, unfortunately the screw cannot be relied on to do the work for us.
After doing a couple of rows I thought my screw lines looked a bit wiggly, as there were being lined up by sight from a plank layed down beside them. I fetched the chalk line from the shed and had a go at using that instead.
It is a very pretty blue line, so that was nice, but not sure if it made much of a difference to my straight screwing! The screws always do a little dance at the start and end up a fraction of a millimetre all over the place. After only 2 hours of screwing the cordless drill battery was completely flat, and the wrists were a bit sore. The generator has blown up so we are without electricity for recharging batteries at the moment. Next step is to cut the rest of the merbau to length.
* Oh and I forgot to mention in the last update - also the 3rd post of the verandah had been erected! Did anyone notice it in the photos?
It is so lovely to finally have somewhere on this 17 acres that I can comfortably walk barefoot - pure bliss!
I was given a demo on how to screw in the screws, a bit more tricky than it may seem at first. The screw has to screw through the wood first, and then through the metal underneath.
The hole in the wood is a little oversized due to the wings on the bottom part of the screw, so it is a little difficult to stop it from wiggling around sideways. And as the screws are heavily galvanised to protect from rust, they are not very sharp for cutting through wood. This means that it generates a lot of heat as it spins around quickly while very slowly moving downward, so some lovely wood smoke comes out of the hole and the sawdust comes out looking a bit black and singed. (Don't worry, it is not a bushfire hazard.)
When the screw finally hits the metal it suddenly screws downwards very quickly. The wrists get a bit sore as it requires a fair bit of downward pressure, unfortunately the screw cannot be relied on to do the work for us.
After doing a couple of rows I thought my screw lines looked a bit wiggly, as there were being lined up by sight from a plank layed down beside them. I fetched the chalk line from the shed and had a go at using that instead.
It is a very pretty blue line, so that was nice, but not sure if it made much of a difference to my straight screwing! The screws always do a little dance at the start and end up a fraction of a millimetre all over the place. After only 2 hours of screwing the cordless drill battery was completely flat, and the wrists were a bit sore. The generator has blown up so we are without electricity for recharging batteries at the moment. Next step is to cut the rest of the merbau to length.
* Oh and I forgot to mention in the last update - also the 3rd post of the verandah had been erected! Did anyone notice it in the photos?
Friday, 4 August 2017
Verandah Joists
The verandah joists have been put in, looking very nice.
The merbah decking has also started being cut to size, leaving some cute little short bits to make castles with.
Sunday, 30 July 2017
First Verandah Posts
The first two verandah posts have been put up, along with the connecting beams.
The tops haven't been cut to the correct height yet, so don't freak out that one looks higher than the other. There is going to be a third post between these two.
Next step is to add more beams and what-not. I haven't been very involved with these steps as I have been at a paying job, and by the time I get home it's too dark for photos!
The tops haven't been cut to the correct height yet, so don't freak out that one looks higher than the other. There is going to be a third post between these two.
Next step is to add more beams and what-not. I haven't been very involved with these steps as I have been at a paying job, and by the time I get home it's too dark for photos!
Subscribe to:
Posts (Atom)