Wednesday, 27 February 2019

South Wall

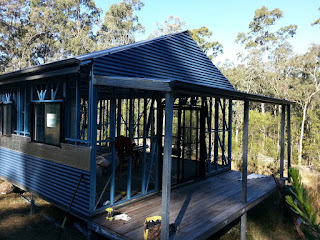
       In Nov 2018 we were lucky enough to have family come and visit who were keen to help build the house. The south wall was started with a row of insulation stuck on, and was cut to fit snugly around the windows. Then the botttom wall channel was screwed right at the base of the wall. In the bottom of this pic you can see the metal cladding which has been cut to fit around the window and is ready to be screwed in place.


Then the bottom row of cladding was screwed on in two pieces. The work was much easier with two ladders, especially since this side of the house has a drop of a couple of metres down to the ground and so is much harder to reach.


       At this stage the boys were working so fast that I was unable to keep up with them with my usual system of taking photos at each stage. All I know is that they cut the pieces of cladding, and screwed them onto the wall so efficiently that they had the whole wall done in two half-days of work.


       On the third day they made a quick trip to the 'local' hardware store to purchase supplies to start putting up the eaves. This was a drive of almost an hour each way, so they made sure they were up early in the morning at 6am to get as much done as possible on the last day. This shows serious dedication! For the eaves they first screwed up metal supports, and cut pieces of fibre cement board to size. This cement board was then slid into the fascia-board channel and screwed to the metal support. Each cement board was connected to the next with a special plastic joiner.


       It was great having someone helping to build the house, and even better that they brought all of their own tools. Their tools were much better than our tools, as we can only afford the cheaper ones. Our helper also knew a lot about building that we didn't know, so it was incredibly helpful. We had no idea how to do the eaves, as this was not included in the kit-home. Thank you so much for saving us when we had reached this difficult stage!

       It was amazing how quickly the work got done with another strong helper or two around. The same work had taken us months to complete on our own, and suddenly it was done in a couple of short days. I didn't know whether to feel despondent that we had previously been so slow, or somewhat happy that we had made progress at all. Sometimes it is difficult when life becomes so busy with work, community commitments and just coping, and then building a house on top of that. I try to tell myself that baby steps are better than no steps at all, and to be ecstatic if any progress at all is being done.

Tuesday, 19 February 2019

North Wall continued


Sep 2018
         Next step on the north wall was another row of insulation, and then another row of external metal Colorbond cladding. Before we could do this the bottom row of insulation was cut back around the windows for neat and snug fit. Around each window there is a built-in thick black plastic flashing, so this provides extra protection from any rain water getting through the walls. The second row of insulation goes most of the way up to wall, leaving a gap of around 300mm at the top of the wall.


        Then the metal cladding had sections cut out to fit around the windows. These windows have a groove in their frame along the sides and bottom into which the cladding slides. 


There were two pieces of Colorbond cladding which completed the second row, and they overlap in the wide gap between the bedroom and the bathroom window.


 These pieces come almost half-way up the windows.


These were held in place and then screwed to the metal framework with tek-head screws. These screws are all coated with Mountain Blue (trademark) coloured paint so they are perfectly matched to the wall. Unfortunately this paint does chip quite easily when the screw does not go in correctly the first time (which happens quite a lot), so we have accumulated a collection of slightly bad-looking screws which we can re-use somewhere that they aren't too obvious.


For the third row of cladding we were unable to just cut out sections to slide around the windows as the cladding was unable to slide over itself while being tight inside the groove, due to the corrugations. This meant that we had to cut two pieces to go between the windows, slide one in sideways first and screw it to the frame, and then slide the second one in with an overlap to the first one and screw it to the frame.


 Two pieces between the kitchen and bathroom windows, two pieces between the bathroom and bedroom windows, and one piece at each end on the outside of the windows meant there were six pieces making up the third row. 


These pieces come up about 200mm above each window.


To complete the north wall became very tricky at this point since it involved a special top-of-wall channel, the inclusion of eaves and somehow cutting back the fourth row to fit over the windows, so it was put on hold while we moved on to the west wall. First we had to put a tiny short piece of Colorbond about 70mm high underneath the glass sliding door, of course it had insulation put behind it first.


On the right hand side of the sliding glass door, we stuck up a length of insulation, then screwed on a panel of cladding.


Then we stuck up more insulation to finish that side and above the door, and screwed on another row of cladding.


At this point we stuck up a row of insulation on the left hand side of the door, and then screwed on a row of cladding. We were actually quite reluctant to put a wall onto this section, as it had been very handy to just reach through the wall to put or grab tools or water bottles while we were working. After the wall was up though, we quickly got used to the new situation and did not miss the convenience too much.


And then a third row of cladding was screwed on the right hand side of the door. Starting to look pretty good!


Sunday, 3 February 2019

External Wall Cladding


August 2018 - East wall continued
     The first sheet of cladding to be cut (the fourth sheet up the wall) only needed the first tips of the corners cut off, so that it installed basically the same as an un-cut sheet of cladding. At one point the side of the sheet did not screw in flat, and we considered leaving it with a bit of a gap of a few millimetres, as it should have been rain-proof anyway, especially with the addition of some silicone. But the next morning it just looked too wrong, and we spent several hours unscrewing and rescrewing half of the wall sheet. It certainly felt like a waste of time losing half a day of work just to get basically the same result, but the wall looked much better after fixing it.

     The next row of cladding had to be cut back quite a lot, and once it was in place then there was only the tiniest piece left that needed to complete the height of the wall. Here you can see it with the ropes in place ready to pull. This rope was a very strong tow-bar rope which was given to us by a very special person, and has come in very handy. Thank you so much!


     The smallest piece left to put in place was less than 30cm high so felt quite ridiculous, especially since most of that 30cm was the overlap with the next sheet below it of about 10cm. At least it did not require ropes to lift it up to the top!


      Once this piece was in, the wall looked amazing. We are very happy with our choice of Mountain Blue for the Colorbond colour, as it really blends in well with the bush surroundings.


     We were unable to cut all the sheets to size from the start, and had to wait until each sheet was up before measuring how much needed to be cut for the next one, as there could be a lot of variation in the overlap between sheets, and the amount of vertical bowing of the sheets. A difference of only 5mm over 5 sheets equals 25mm, which would be a big problem by the time we got to the top of the wall. There was some room for error at the top angles of the wall though, as any gaps less than about 100mm would be covered by the flashing which came over the corner of the roof sheeting to finish the join.


     Since Josh had done such a brilliant job cutting the triangle pieces for the top of the east wall, he decided to go ahead and cut the same angled pieces for the triangle wall at the west end of the house. At this end, the wall is interrupted by the glass sliding door and the verandah roof, so the triangle above the verandah roof had to be treated as its own separate section. Again the insulation was used to create a template, and then this was traced onto the cladding while laying on the verandah floor.
This wall section was much easier to screw in, as we were able to stand on the verandah roof while we were working. When you are able to work with such ease, the work progresses at a much quicker rate. First we put up the L shaped flashing which sits at the bottom of the wall section and out onto the verandah roof, then the insulation, then the first sheet of cladding, and then the top sheet of cladding.


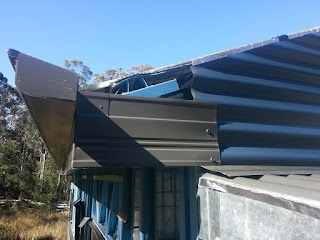
     After we completed this, we went back to the east wall and put up the roof flashing. This slid under the ridge cap at the top of the roof, and went down to the gutters on each side, following the corner where the wall meets the roof. This simple addition was incredible with the difference it made to the look of the wall, as it made the whole building come together. We are very happy with our choice of Slate Grey (also known as Woodland Grey) for all of our flashing on the house, as it compliments the Mountain Blue perfectly.


     Next was the roof flashing at the verandah end of the house, and after that came the box-ends. We had not been provided with these by the kit-home company, and did not even know what such a thing was, but it connects the fascia on which the gutter sits with the walls at each end of the eaves. After a lot of thinking and drawing diagrams we managed to figure out how to make our own out of the left-over fascia board. Josh was very clever and used his metal-working skills to create these very neat-looking and perfectly sized box-ends.


We discovered that each of the four corners of the house were slightly different measurements, so each box-end had to be tailor-made to fit each corner. The bottom of the fascia had to be cut out to that the side could overlap the house enough to be securely attached, while creating enough height to fit under the roof flashing and fill all the gaps. The last of jobs we needed to do with the tall borrowed ladder was to install the box-ends on the east side of the house, which we did just in time to return the ladder. 

     Next the box-ends were made and installed on the wall above the verandah, and the roof flashing installed also. It looks amazing, creating a very well polished finishing effect.


     We found ourselves just standing there and looking at it, with oohs and ahs coming out of our mouth. Very pleasing!

Thursday, 31 January 2019

External Wall Cladding North and East Walls


June 2018
At this point we discovered that the next row of cladding on the north wall would be too difficult to put into place before it could be screwed, so we changed to working on the north wall. This was another easy start, where we put up a row of insulation, screwed the bottom wall cladding in place, and lifted the sheets into position and screwed them into place while standing on the ground.


The north side of the house is 10 metres long, so this used two sheets of cladding with an overlap in the middle.


Both of these sheets of Colorbond cladding were short enough to fit under the windows, so no cutting of metal sheets was required as yet. You can see in the photos that the insulation overlaps the bottom of the windows, but that was easy enough to cut back with a stanley knife, which we did at a later stage.


Then we realised that the next row on this wall required cutting to fit around the windows, so the east wall switched back to seeming like the easier option.

July 2018
On the east wall, the first two rows of cladding were able to be lifted it into place while standing on the ground and the ladder, but after that it got much trickier to be able to lift and hold the cladding in place while it was screwed in. I came up with a clever idea to drill holes in the top of the cladding, place strong hooks through which are threaded with rope, and then loop the rope over the top of the wall frame and pull it up into position.


Josh was dubious as to whether the hooks would hold the weight of the sheet without simply shearing through the metal, but after testing the system we discovered that four holes managed to distribute the weight evenly enough so that it was not a problem. This system meant that Josh was inside the house pulling the ropes, whilst I was on the outside guiding the sheet so that it did not scratch the previously installed sheet, and making sure that it was level and the correct height. Then I would put clamps on the sides, position the ladder, climb up and drill in the screws. Since we were shouting at each other through a wall, we devised a method of communication where we could specify which rope needed pulling at which time, with the ropes numbered 1 to 4. This was much easier than saying 'the rope closest to the creek' or 'the rope closest to the middle on the fence side'. Sometimes the most important part of building is good communication.
Before we could put up the next sheet of cladding, we had to put up the next row of insulation. I checked the instructions for the insulation which specified that there needed to be an overlap of 10cm for each sheet. Diligently we did so, and then when we tried to screw in the next sheet over the top of the two overlapped sheets of insulation, it created a problem. The combination of thicknesses was greater than the length of the screws with which we had been provided.
Luckily we had some leftover roofing screws which were a little thicker and a fair bit longer, and even though the colour of the screws are Woodland Grey instead of the Mountain Blue of the cladding, the colour difference does not stick out very much once you are looking at the wall from ground height. These roofing screws were also useful for the occasional times when we had to screw through bracing, or just had a very troublesome screw that just would not go in. So we learnt our lesson there - don't overlap the insulation because it does not suit this building situation.
Next we hit a tricky part where we would have to do some sheet cutting. The top of the east wall has a triangle to fit the gable roof. Josh had the genius idea of using the insulation sheet as a template for cutting the cladding to ensure he achieved the correct angle for the three sheets which needed to be trimmed back. It was all laid down on the verandah floor for a flat surface to be measured and marked out, and the insulation was stuck up.


Actually sticking up the insulation was a little trickier than it sounds. It requires one person to hold the 6 or 10 metre length up while the other person sticks it to the frame with insulation tape. This insulation tape is a cross between alfoil and gaffa tape, and while it is more expensive than gaffa tape, it has much better sticking power which is what was needed for this situation. We tried using gaffa tape but it quickly came unstuck in the wind. We luckily had borrowed a ladder, so it was possible for one of up to be up one on the outside and one of the inside at the same time. Otherwise it was have definitely been impossible. Thank you so much to Graham for the long-term borrowing of your ladder, without it we would not have been able to build our house. We owe you in return.


It was amazing what a difference it made to the inside of the house once the insulation went up and created a wall which suddenly blocked out the light, breeze and the view. I found it quite annoying, and often wished that I did not need to put the walls. I eventually discovered that the advantages of walls include keeping out a cold wind, keeping out the hot sun, and keeping out the unwanted creatures. These creatures included the swallows who thought that the roof frames would be a great place to build their nests. We wouldn't have such a problem with them except that they have a habit of pooing on EVERYTHING near where they are nesting, a lesson we had already learnt in the shed. Very messy and unhygienic.
Josh diligently went down to the house every day and knocked down the mud nests, but they kept rebuilding. We didn't want them to get to the stage where they had laid eggs, because then we wouldn't have the heart to destroy the little babies. The swallows kept coming back despite the destruction of their nest attempts, so Josh came up with a new plan - wait a couple of days for them to get some significant mud building done, and THEN go and knock it down. Well, this certainly worked because after doing that once, they have never come back and built there again.

Tuesday, 29 January 2019

Started External Wall Cladding


     Finally time permits me to be able to give you guys an update on the building.We have been working hard, sometimes on other things than the house, but progress has been made nevertheless. My employment has finished after a busy harvest season and suddenly things are happening at a much quicker rate. It has taken days to write down what we've done, so I will be posting the progress in installments.

     In May of last year we finished installing the windows and glass sliding door, so we moved on to putting up the external cladding. We started on the east wall as it seemed easiest. This was because it has no windows, and this means no cutting of sheets. The 6 metre width of the house matched exactly the 6 metre lengths of cladding we were provided with. It sounds very simple!
This involved first putting up a length of insulation, then screwing the bottom wall channel over the top of it. This bottom channel is what the bottom sheet of cladding sits in. The plans which the kit home gave us did not specify at exactly what height this is supposed to sit, so we just had to figure out what might be best using our own wits.


     Then we lifted the first row of cladding into the channel, and then screwed the cladding into the wall frame studs. We have been provided with tech-head screws which drill their way through the metal cladding, insulation and metal studs, so this means no predrilling holes. We did need to know where the studs were though, so we at first estimated this by looking upwards to where the studs were visible above the insulation. Sometimes this worked fine, sometimes we were a little off. The studs are around 5cm wide so there is a bit of wiggle room - as long as you don't miss the stud entirely the wall will stay on!


     We then came up with a couple of different systems to try and keep the screws lined up correctly to hit the studs, such as using the plumb bob on a string down from the drill to the screw below it, and creating our own plumb bobs from screws which have been tied to string and then wrapped in gaffa tape so they don't scratch the wall. These were attached to the top of the wall frames, and hung down to mark the studs. Halfway up this wall the studs all changed to different places, so we had to place our plumb bobs all over again. And then again for the triangle part at the very top of the wall. A lot of trouble to go to, but better than missing the studs.


     The next day of work we put up another row of insulation, and then another row of cladding. Once we put up the insulation, we had to work fairly fast to get the cladding on before it blew away in the wind. The cladding was lifted into place and then held there with clamps on the wall frames until we got the screws in. We discovered that the corrugated cladding was a lot more flexible than you might think, as it bowed in and out of the wall significantly, bent up and down the wall surprisingly, and also the corrugations changed the height of the sheet depending on how much each corrugation was pushed down. All of these factors meant that it was quite difficult to make each sheet screw on straight.

     Sometimes one screw would be slighly off and then this would completely change the tension of the sheet and put it askew. The only thing to fix that would be to try and toe it in the right direction, or just to start again with another screw hole, leaving a hole in the wall to be sealed with silicone. We discovered that it was not really feasible to quickly put a screw in the middle and each side and then come back and fill in the gaps once it was secure, as this led to too much bowing of the sheet. Instead the longer method of starting in the middle and taking turns left and right to work out to the sides stud by stud, gave much better end results. This meant moving the ladder back and forth for almost every screw, which was very tiring to move it and to climb back up and down it every time. I tried to count the rungs every time I went up and down but kept losing count when I got over 10!


     We took every due diligence for working safely with ladders, as we certainly could not afford the time or money which would be involved with an injury. The top of the ladder was chained to the wall, the ground was dug with the shovel every time we moved to a new spot to ensure it was level, and I always kept in mind a great piece of advice which I learned from one of my Rural Fire Service buddies. Ted told me whenever climbing in and out of the RFS truck 'always have three points of contact', which means that out of your two hands and two feet, only one of them isn't firmly planted at a time. It is something which I believe has saved me many times, and well worth passing on to others.
     The time taken to screw in each sheet stretched to an entire day of work, by the time we set everything up, made sure the sheet was straight, adjusted the clamps after each screw, and moved the ladder at least 10 times for each sheet. There were many times when we finished work at dusk and were unable to take a photo of our progress because it was too dark!