Wednesday 27 December 2023

2022 May

Winter was approaching and I was a little worried about the new water pipes under the house freezing and bursting. We bought special insulation tubes that are specially designed for this. It was a simple job but involved a lot of awkward angles crawling around under the house.


      The insulation tubes were easy to use, they could be cut with scissors, applied at angles and around corners, and I soon worked out some way to get them to stay up on their own.


      I was listening to podcasts as I crawled around under there to keep me entertained, constantly losing my scissors cos they were behind me. At some points it was a bit confusing because the copper pipes were a mixture of cold water, hot water, and gas. They were coming off and going to the hot water system, then coming back in, then one was going to the gas stove with gas, and then the water ones were going off to the shower, the basin, the laundry and the sink. The ones with green plastic around them are the hot water so at least that's easy to keep track of. The silver tape around the black insulation is special insulation tape which is extra sticky, so perfect for this situation.

     The hot water system has water in, gas in, and water out. I thought the gas pipe probly didn't need to be insulated. I used some zip ties to hold these tubes on.


     I was glad that I insulated the pipes when I did because the very next month the temperature went down to zero and everything was frozen. I was very happy with the peace of mind I achieved for a comparatively small cost and easy job.


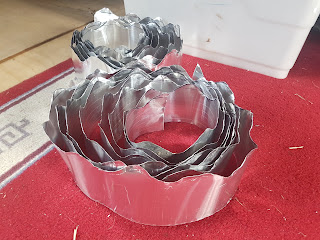
Another job that needed doing was filling the gaps under the ridge cap where it sits on top of the corrugated iron. After perusing all the options the best solution seemed to be aluminium sheeting which we cut to size. We held a corro offcut against the aluminium and copied the wiggle with a permanent marker, then cut along the wiggly line by hand with a pair of tin snips. This was thin enough to cut and bend to the right size and shape but strong enough to keep out wind and fire embers. The bushfire rating for our house (BAL 29) required there to be no gaps smaller than 4mm anywhere around the outside of our house. We already had aluminium mesh inside the roof but wanted to have something that was better at keeping out wind and rain.

    Josh climbed up on the roof, unscrewed the ridge cap a little and slid our custom made gap filler underneath and re-attached the ridge cap. We were worried that the shiny aluminium would be unsightly on the roof compared to the grey, so bought the Colorbond matching grey paint and painted it after application. You can't even see it anymore.

Friday 1 December 2023

 2022 January

     Over a year since the stainless steel tank was delivered (November 2020), we finally got around to putting up the downpipes. The gutters on our house run along each side, a 10 metre length on the north side and a 10 metre length on the south side. The photo below shows the south side. On the left you can see the separate verandah roof gutter which has its own downpipe into a 100 litre plastic tank.


      This meant that the downpipes had to come down from each side separately and then join in the middle, and then go across the gap to go into the tank. This was quite tricky because you can't just put both sides into a central pipe at once - there is no plumbing part to suit this situation. I can only guess that's because the two flows of water will hit each other and slow down too much. This meant that one side had to come down at a different angle to the other side, but there is only so much wiggle room you can do when fitting one pipe to another pipe. The solution Josh came up with was to install a bit of a wiggle which you can almost see coming down from the gutter on the left hand side.

          The distance from the house to the tank was a bit too far for the downpipe to support itself without sagging, so Josh constructed a support pole to keep it staying upright and stable. First he made a metal box for the base, ready to fill with concrete.

Then he filled it with a concrete mix and attached some leftover metal framing to be the support pole.


          Below you can see the finished set-up.  We also installed a first flush diverter to try and keep the water going into the tank a bit more clean.


          The first flush diverter is the grey pipe which comes straight down along the house wall below the white pipes. It is designed to fill up with water when it starts raining, and has a round empty plastic ball the same width as the pipe inside it. When the ball floats to the top, it hits a seal so that the rest of the rain goes straight into the tank. This means that any leaves, dirt, bird poo or other nasty stuff gets washed off into the diverter, and the rest of the rainwater is much cleaner and goes into the tank. The diverter has a small hole at the bottom so that it slowly drains away and is ready to repeat the process the next time it rains.

     The diverter is designed to drain into a garden hose, so you can direct it away from your house. Unfortunately the bottom seal always leaks so I had to put a container underneath to catch both the drips and the intended leakage, and then another hose coming from the bottom of the container which goes down into a garden bed. Below is the tiny hole it is designed to slowly leak from.

         The pic below shows the ball and the filter just before I reassemble after cleaning. This kit was available from Bunnings for about 20 bucks, and then you supply your own pipe, and adjust the length to suit the size of your roof.

          We also added an outlet pipe for when the tank overflows as you can kinda see on the right of the below pic. The pipe comes out just below the top of the tank, turns a corner and goes down the side of the the tank, turns another corner and the pipe continues a couple of metres away from the tank.

          We painted the pipes with grey paint which is tinted to exactly match the Colorbond grey on the trim of the house. This both changes it from looking horrible ugly to quite classy, and also protects the plastic pipes from degrading as quickly in the sun. Unfortunately plastic hates being painted and it peels off with the slightest bump, but a few coats mostly did a decent job.


          I will admit that these downpipes have blown down a couple of times when we have had big strong winds come through with storms, but a quick repair job and they have been faithfully putting water into our fancy tank every time it rains. It was even overflowing after the heavy rains we have had over the last month. Very happy!